Azure B2C authentication with API and SPA
In this post I configure an Azure B2C tenant, register an API application and single page application, authenticate users through the single page app, and authorize endpoints in the API application for the single page app to use. That's a lot of steps! To get started, you will need an azure subscription with permissions to manage azure active directory B2C, Visual Studio 2019, node, and npm. For my example, I'm running node version 12.16.2 and npm version 6.14.4. The API is an ASP .NET Framework application and the single page application uses vanilla Javascript and a node express server to run it. The single page application is based on the Quickstart: Set up sign in for a single-page app using Azure Active Directory B2C quick start guide. The API is based on the TaskService project provided in the following tutorial from Microsoft: Tutorial: Enable authentication in a web application using Azure Active Directory B2C. The example to go along with this post is available in GitHub.
The Application
There are 2 applications. The API is a .NET Framework Web API application with one endpoint namedgamestat. The endpoint supports GET and POST. GET returns all the authenticated users' scores and a timestamp of when each was submitted and POST posts a new score with timestamp.
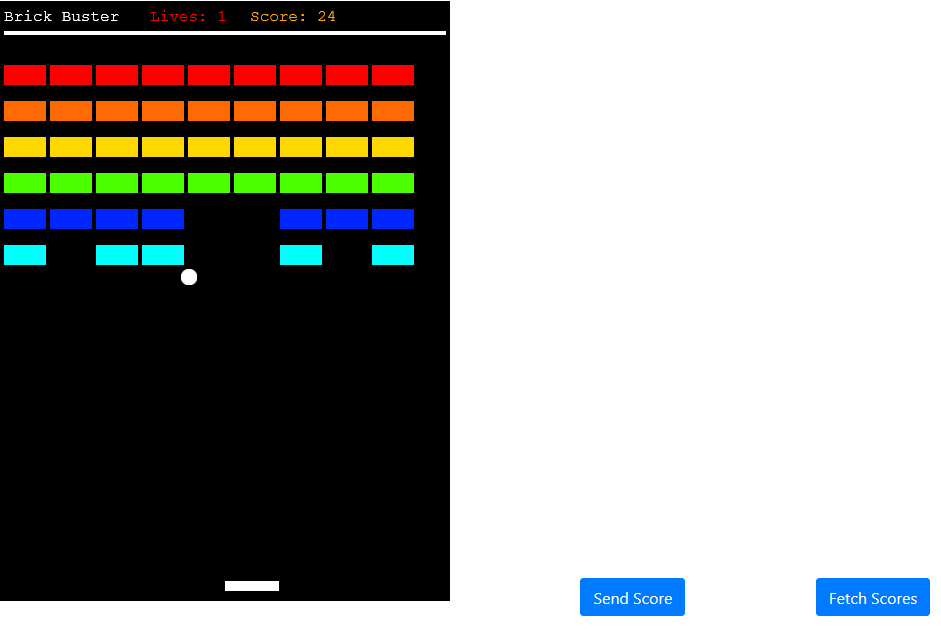
The single page application features a game titled Brick Buster, influenced by classic breakout style games. There is also a title bar to allow the user to sign-in / sign-out and edit their profile if signed in. There are also 2 buttons Send Score and Fetch Scores. Send score will send the user's current score to the API to save it, assuming they are authenticated. Fetch scores retrieves the user's scores from the API and also requires the user to be authenticated. The scores are listed in a table below the game.


Configure Azure B2C
In this section, I will show how to create a new azure B2C tenant to use in the application. This is based on this Microsoft tutorial.The first step is to browse to the Azure Portal. Select Create a resource from the icons.

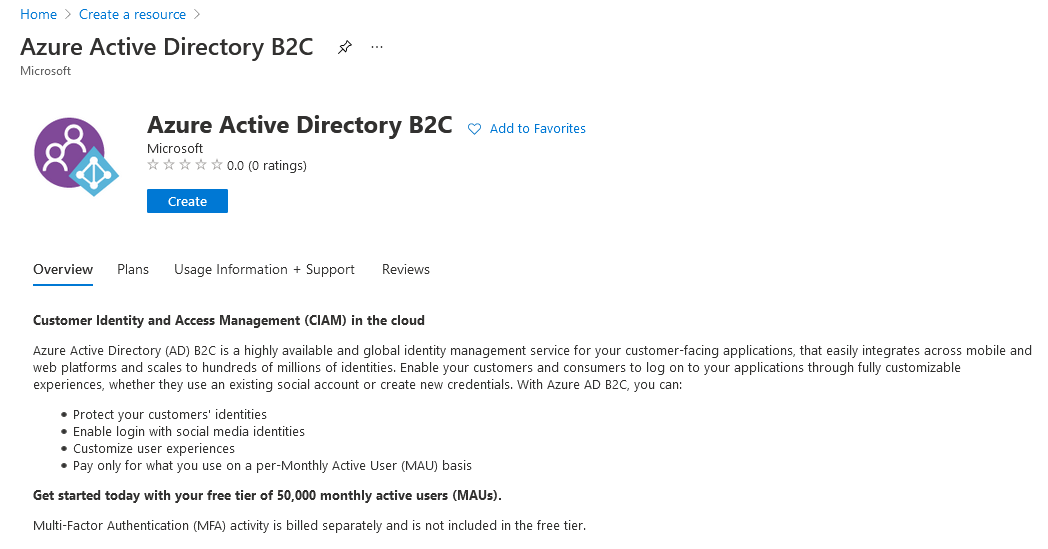
Search for Azure Active Directory B2C and click on it from the dropdown. This brings up the overview page for Azure Active Directory B2C. Click the Create button.
Select the option to Create a new Azure AD B2C Tenant.

Fill in the details for the new tenant. The domain name is the name used to connect to the tenant.
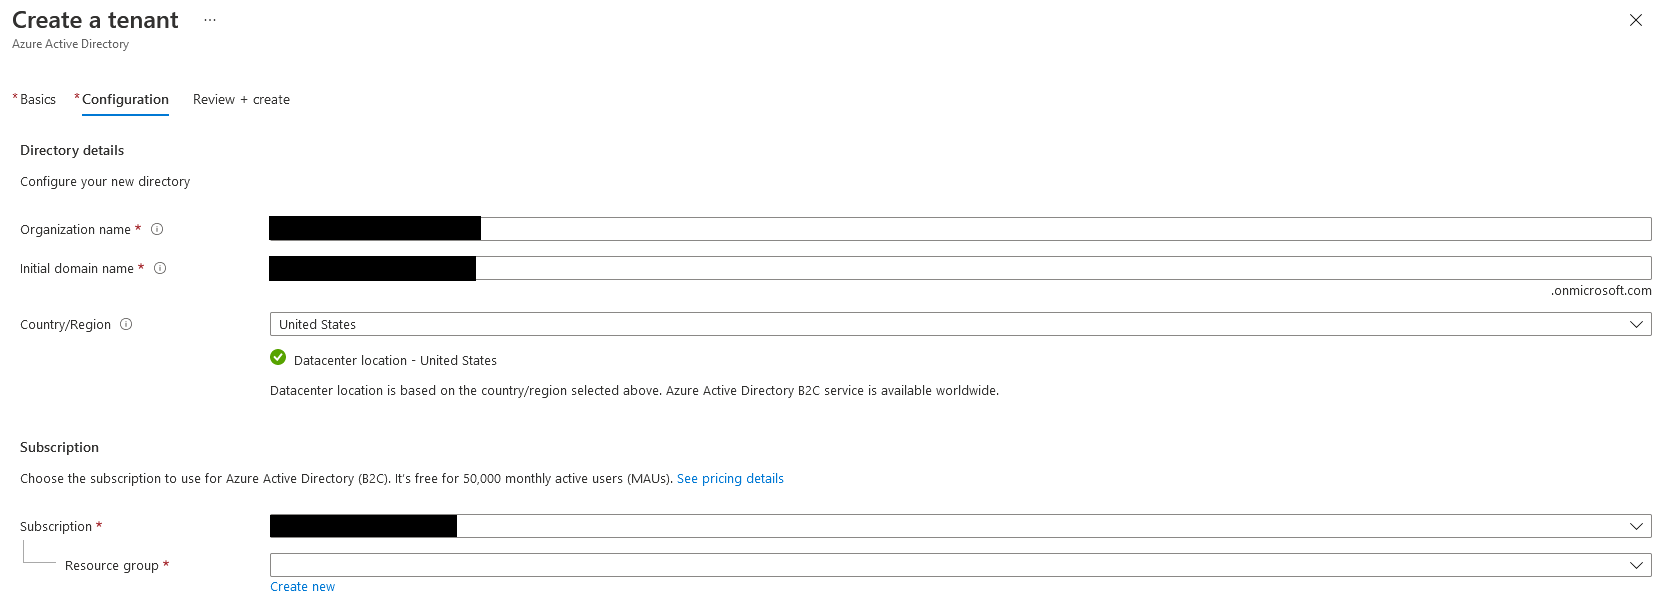
Clicking Review + Create at the bottom of the page, validates the entry and allows you to review everything before creating the tenant.
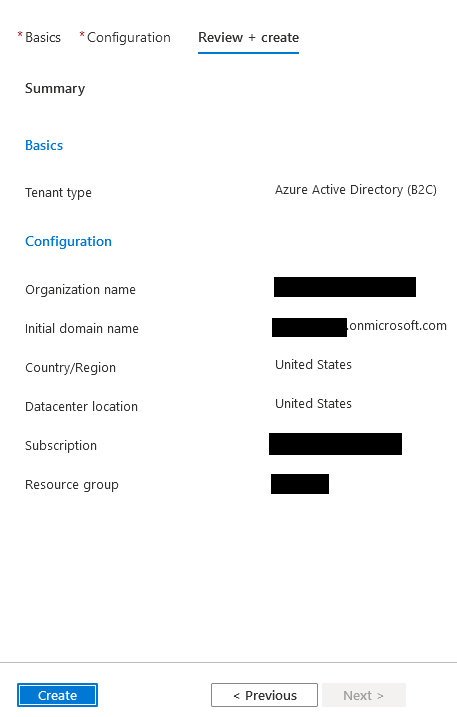
At this point, the tenant is created and a notification will be waiting in the portal notifications area. It's possible to navigate to the new tenant directly from this notification or by switching directories in the azure portal.
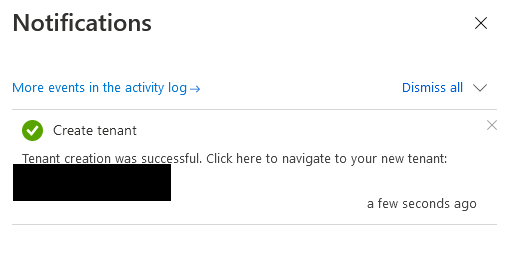
The final step to setup the tenant is to add the user flows policies. These will allow applications to have sign-up / sign-in, edit profile, and reset password functionality. The user flows are shared among all the applications registered in this tenant.
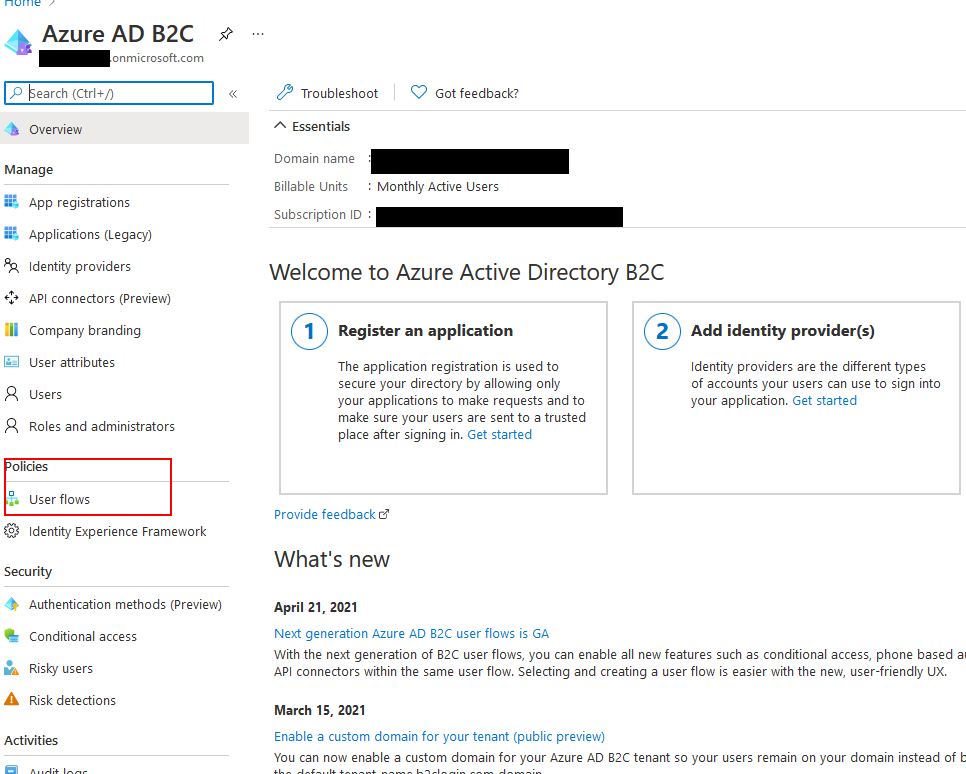
From the Azure Poral, make sure the directory you are currently using is the Azure B2C tenant we created in the previous section, and search for Azure AD B2C and go to the resource. This is the central place to manage the Azure AD B2C resource. For example, you can register new applications and manage users, and configure the User Flows, which is what we're going to be doing now. Click on User Flows under the Policies section.
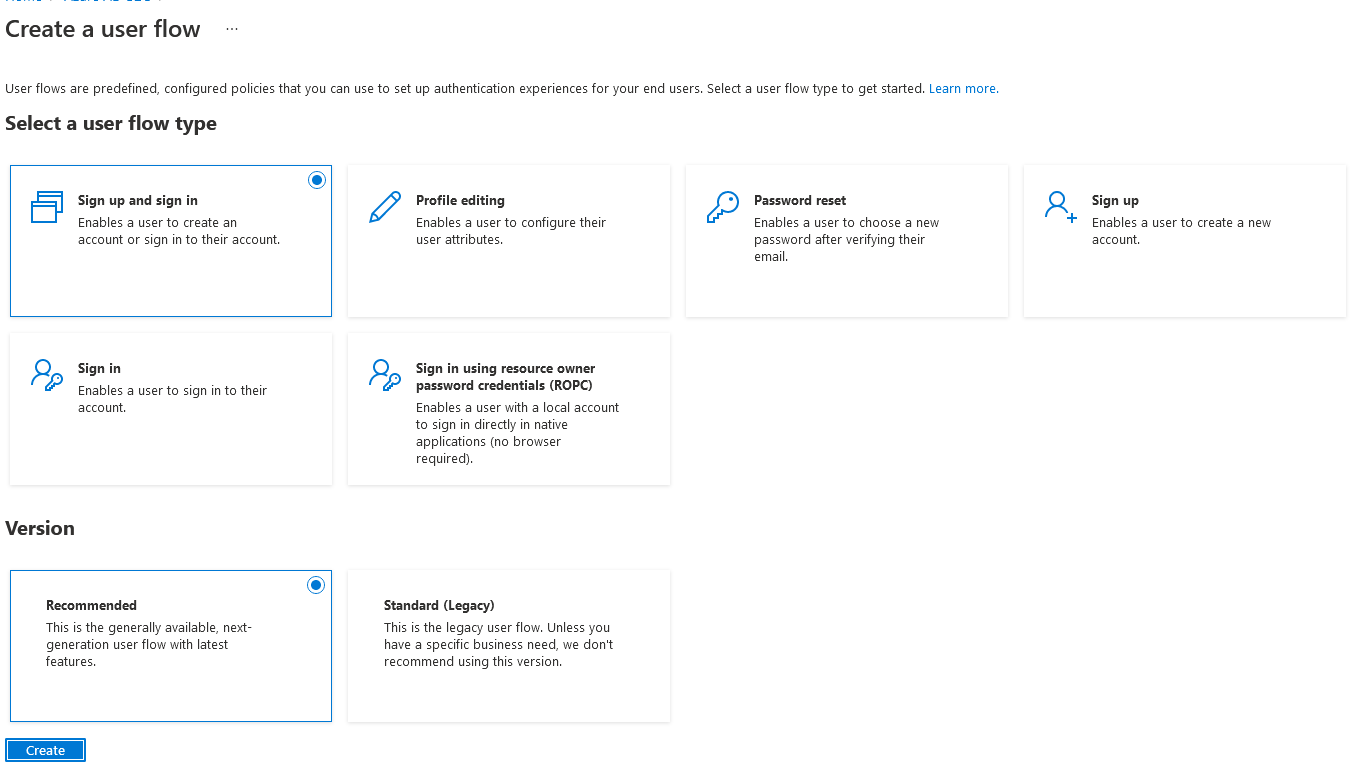
We will setup the first 3 user flows, sign up and sign in, profile editing, and Password reset. Choose sign up and sign in first and stick with the recommended selection
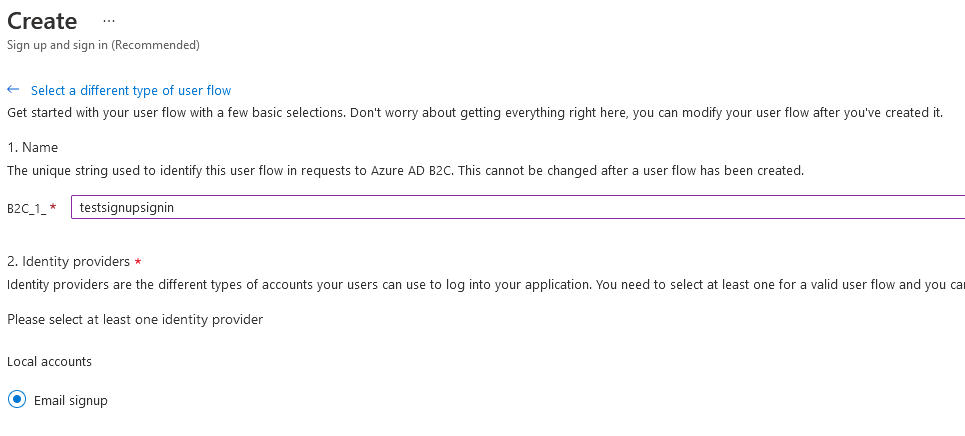
The create screen has a lot of information. First, give your policy a name. This will be used to reference it in the applications. We only have a local email signup provider for this demo so check the radio box for step 2.
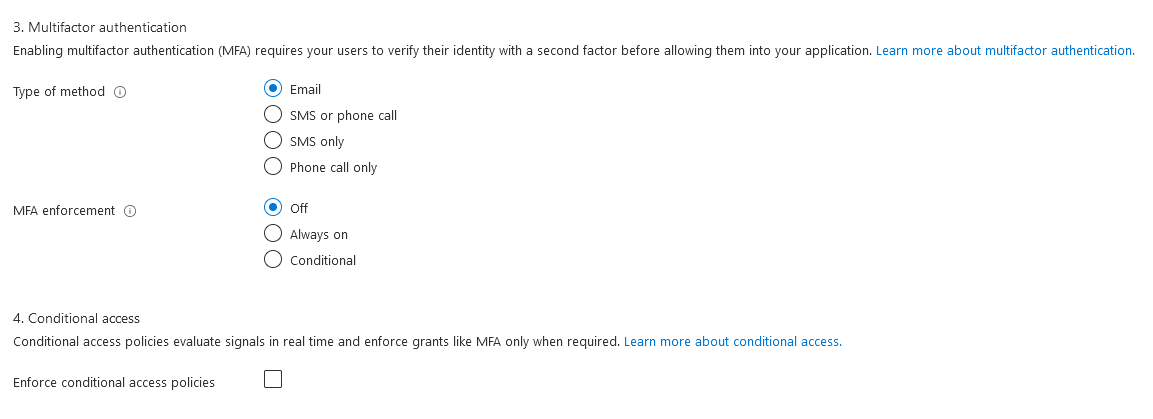
For step 3, multifactor authentication, leave it set to email and off. For step 4, leave enforce conditional access policies to unchecked.
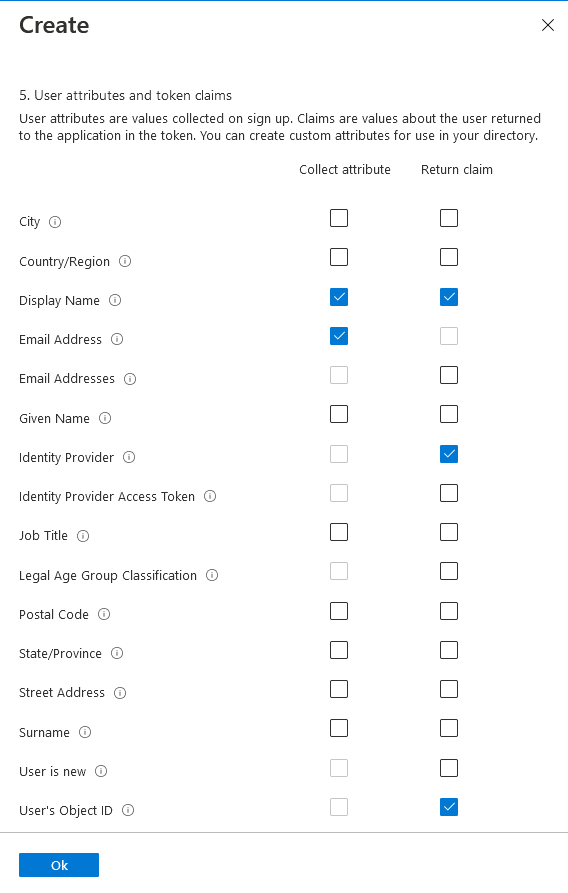
For step 5, click show more and make selections to match the screenshot. Display name is an attribute and a claim, email address is an attribute, identity provider, and user's object ID are both claims.
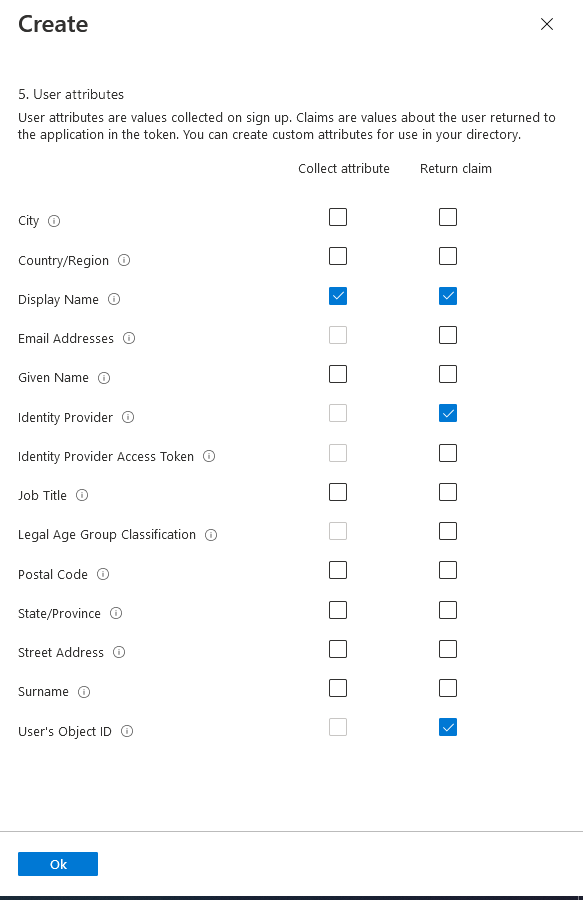
Click Create and the user flow will be created and added to the list. Edit profile and forgot password user flows are similar except the claims and attributes selected are different. For edit profile, choose the Profile editing, recommended user flow. Give it a name, select email signin as the only Identity provider option, leave the defaults of Email and Off for Multifactor authentication, and leave conditional access unchecked. For step 5, application claims, click Show more... and select display name under collect attribute and return claim columns. Select Identity Provider and User's Object ID in the return claim column. The attributes should match the screenshot below.
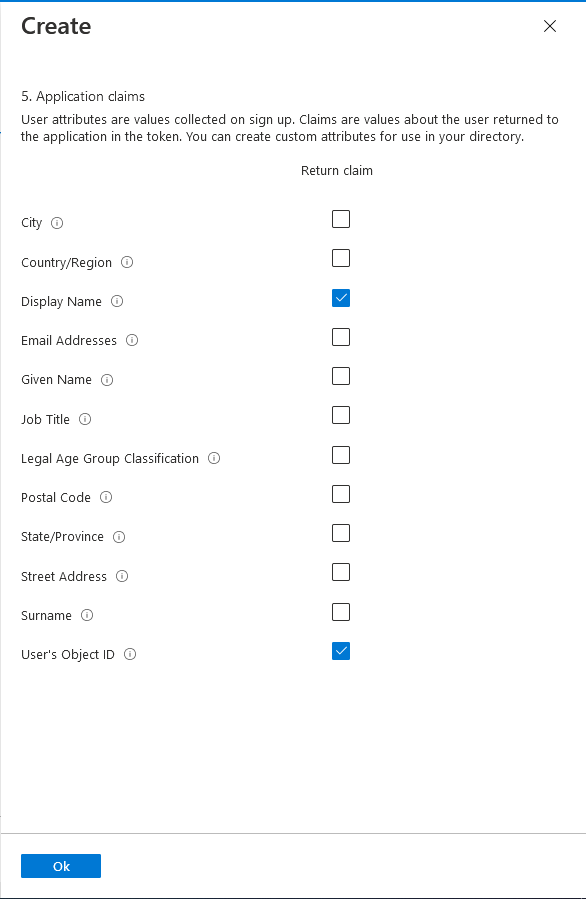
For the password reset user flow, choose Password reset, Recommended and click create. Provide a name, choose the reset password using email address as the only option under Identity Providers, leave the defaults of Email and Off for multifactor authentication, and leave the option under conditional access unchecked. For step 5, application claims, click Show more... and pick Display Name and User's Object ID in the return claim column like the screenshot below.
At this point you have a new Azure B2C tenant with user flows for sign up / sign in, edit profile, and forgot password. In the next section we will register the API as an app under this B2C tenant.
API App Registration
The next step is to register the API application with our new Azure B2C tenant. To do this, start by clicking on the App Registrations link under the Manage section. Then click New Registration at the top.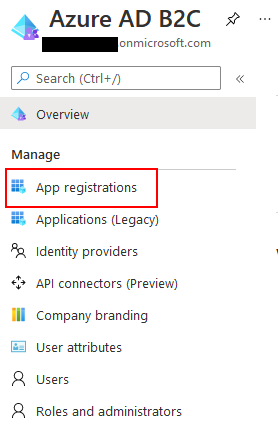

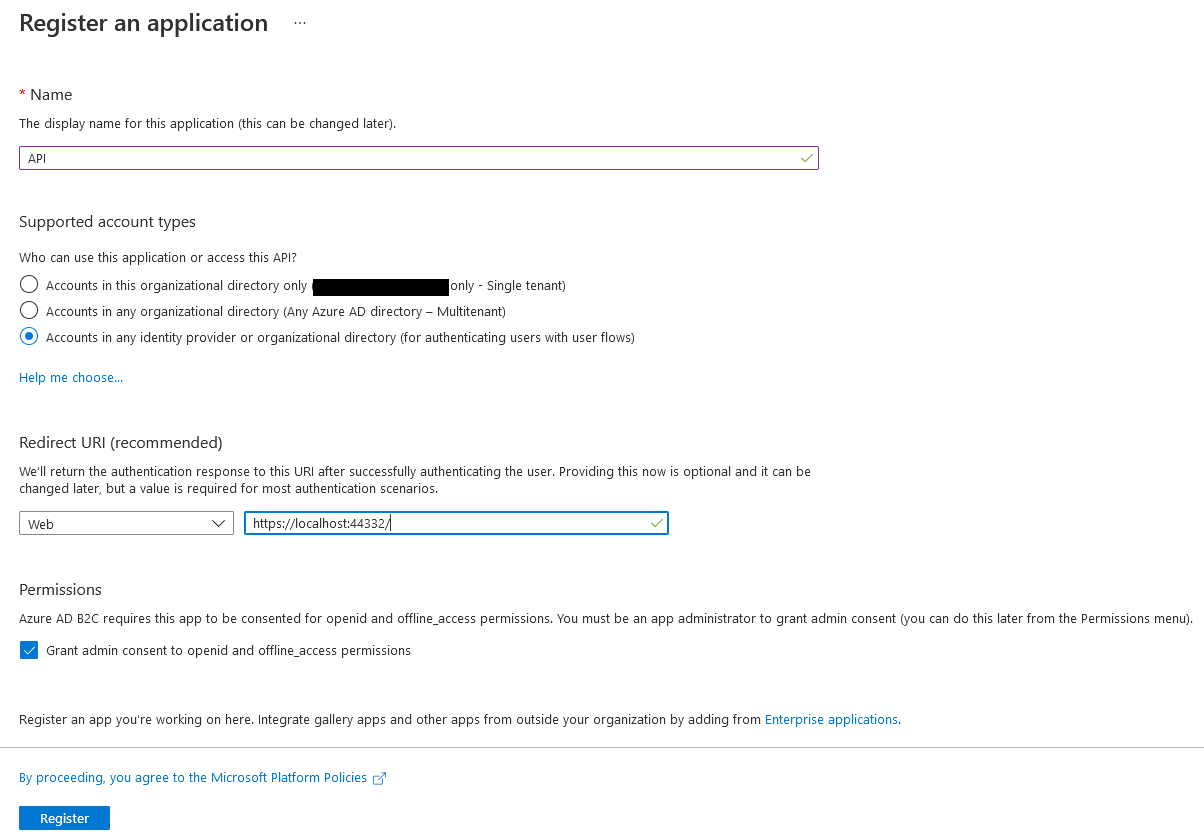
First. provide a name for the application. Next, check the third radio button "Accounts in any identity provider or organizational directory (for authenticating users with user flows)" under Supported Account Types. Select Web for the Redirect URI and enter this URI:
https://localhost:44332/ If you change the ports for the application, this URI will be different. It can also be changed after the application has been created. Leave the "Grant admin consent to openid and offline_access permissions" checked in the Permissions section. This is required for Azure B2C. Finally, click register and your app registration will be created and you will be taken to the app overview page where we will register some APIs for the SPA to use. We'll do that next.
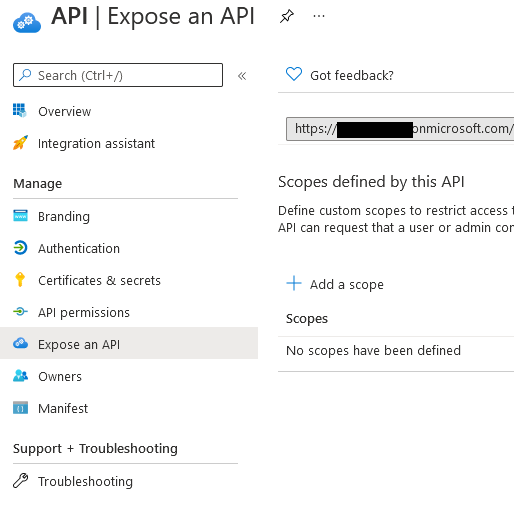
The next step is to expose the API endpoints for our app. Click on Expose an API under the manage section. Click Set next to the Application ID URI at the top of the page. This is the unique URI we will use to identify exposed endpoints. Microsoft defaults this to a GUID, however, if you want you're app to have more friendly endpoints, this can be changed to whatever you like such as /api. The only requirement is that it is unique across registered applications in this tenant. For the example, set it to
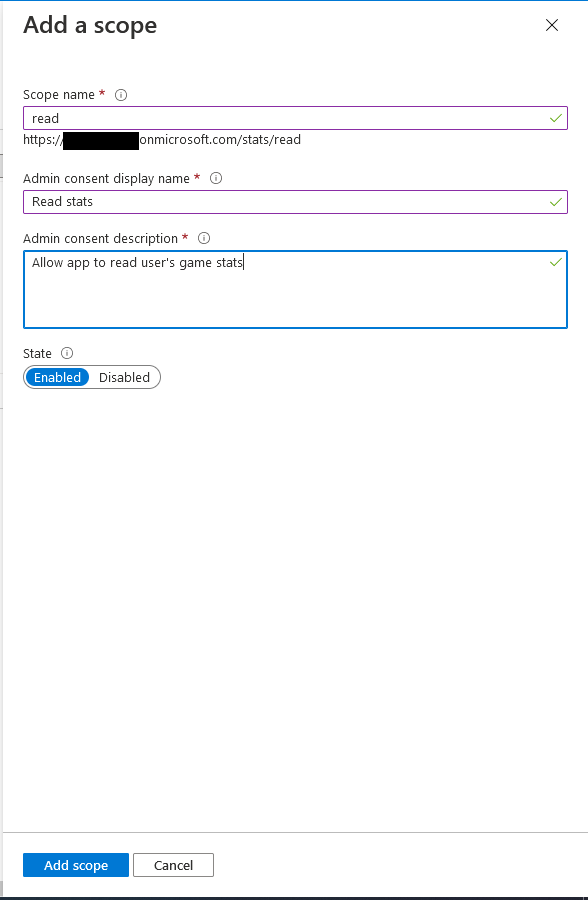
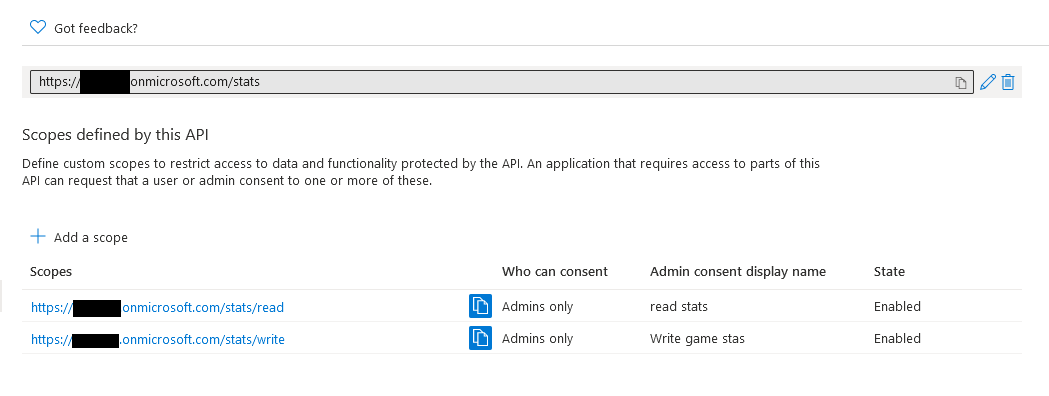
stats. The full URL will be https://<b2c-tenant-name>.onmicrosoft.com/stats. Endpoints that this application exposes are called scopes. Each scope gets a name, a display name, and a description. The name is appended to the end of the URL and this becomes the endpoint that is exposed as the scope. The example application requires 2 scopes, one for read and one for write. The screenshots below add the read scope. Repeat the same process for write. Make sure the name is read for the read scope and write for the write scope. The urls need to match here and in the application configuration for it to work.

When done, the list of exposed APIs should look like this.
SPA App Registration
In addition to registering an app for the API, we also need an app registration for the SPA. Once again, click on New Registration from the Azure AD B2C Overview screen. Give it a name. Under the supported account types section select the 3rd bullet point "Accounts in any identity provider or organizational directory (for authenticating users with user flows)". In the redirect URI section select single-page application (SPA) from the dropdown and provide the redirect URL. The default for the example application ishttp://localhost:6420/. If you change ports in the application, this will need to be updated and can be changed after the registration is created. Finally, under Permissions, ensure "Grant admin consent to openid and offline_access permissions" is checked. Click register. This will take you to the app registration Overview page.
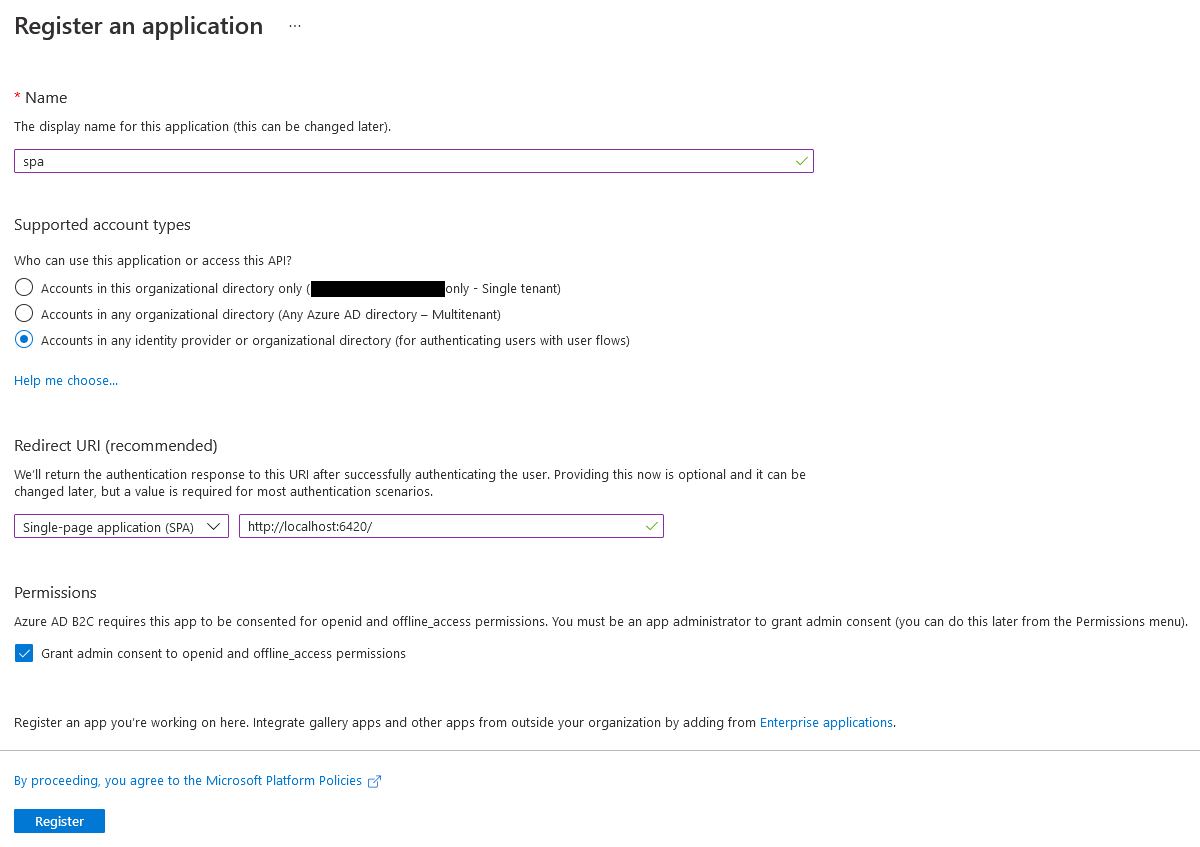
The next step is to grant API permissions to the endpoints we registered in the API application above. Click on the API Permissions link in the manage section.
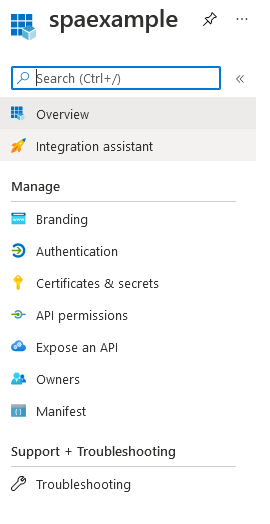
Then click the Add a permission link next to the plus sign.

Click on My APIs and you will see a list of registered applications and can pick APIs exposed by these applications. Click the API application we configured in the previous section. This displays the read and write APIs we exposed. Select both of them and click Add permissions.

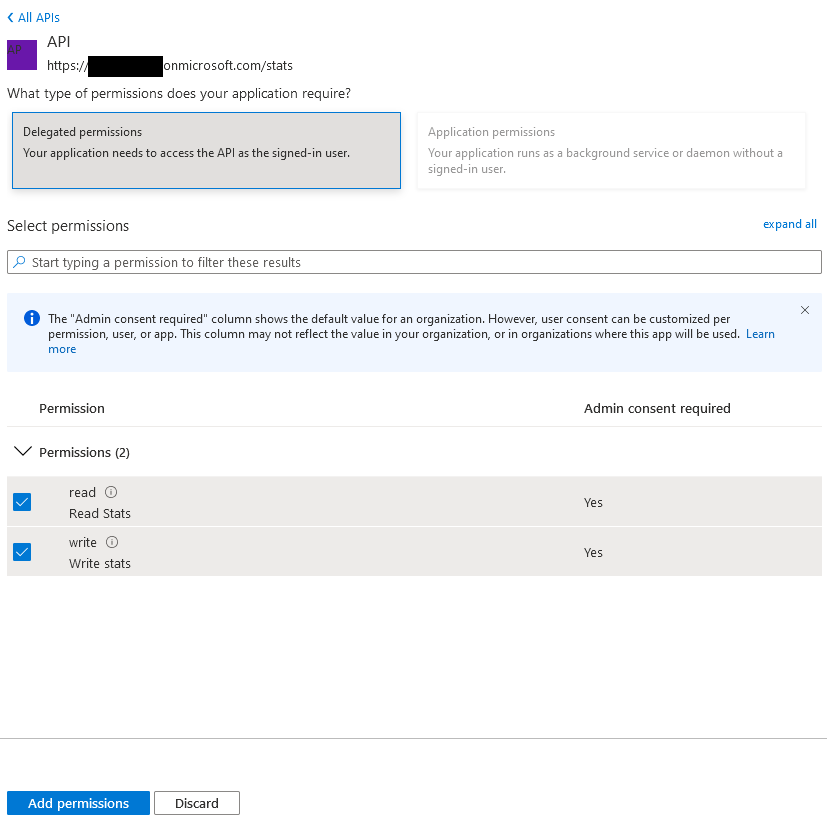
The APIs are added to the list of API permissions for this application. The final step is to grant admin access to these endpoints so our SPA can use them. After adding, the list of permissions will look like the screenshot below. Click the Grant admin consent link to grant admin consent. The warning icons will change to green check marks. If you don't see the grant link like the screenshot, you may need to refresh the page first.

Configure API and SPA Applications
The final step is to configure the applications to use the azure b2c tenant and apps. Clone the GitHub repository. Open the web.config file located at/api/TaskService/Web.config. Update the app settings to match the details of your azure resources. If you named the scopes the same as above, the read scope is called read and the write scope is called write. The app settings section that needs to be changed is below. Anything with --placeholder-- needs to be changed. The --client-id-- placeholder needs to be replaced with the id of each application registered. This can be found from the app registrations list.
<appSettings>
    <add key="webpages:Version" value="3.0.0.0" />
    <add key="webpages:Enabled" value="false" />
    <add key="ClientValidationEnabled" value="true" />
    <add key="UnobtrusiveJavaScriptEnabled" value="true" />
    <add key="ida:AadInstance" value="https://--b2c-domain-name--.b2clogin.com/{0}/{1}/v2.0/.well-known/openid-configuration" />
    <add key="ida:Tenant" value="--b2c-domain-name--.onmicrosoft.com" />
    <add key="ida:ClientId" value="--client-id--" />
    <add key="ida:SignUpSignInPolicyId" value="--signup-signin-policy-name--" />
    <!-- The following settings is used for requesting access tokens -->
    <add key="api:ReadScope" value="--read-scope-name--" />
    <add key="api:WriteScope" value="--write-scope-name--" />
    <add key="rootFolder" value="--local-folder-to-save-score-files--"/>
</appSettings>
The single page application settings have to be changed as well. Open
/client/App/config.js and update the placeholders in the various variables based on your azure configuration. Like the API app, the placeholder is denoted with --placeholder--. The b2cScopes object needs to be the full url for read and write. For example, write would be https://<b2c-tenant-name>.onmicrosoft.com/stats/write. Read would be https://<b2c-tenant-name>.onmicrosoft.com/stats/read
// The current application coordinates were pre-registered in a B2C tenant.
const apiConfig = {
    b2cScopes: ["--b2c-scope-read--", "--b2c-scope-write--"],
    webApi: "https://localhost:44332/api/stats/"
  };

  /**
 * Enter here the user flows and custom policies for your B2C application
 * To learn more about user flows, visit: https://docs.microsoft.com/en-us/azure/active-directory-b2c/user-flow-overview
 * To learn more about custom policies, visit: https://docs.microsoft.com/en-us/azure/active-directory-b2c/custom-policy-overview
 */
const b2cPolicies = {
    names: {
        signUpSignIn: "--b2c-signup-signin-policy--",
        forgotPassword: "--b2c-password-reset-policy--",
        editProfile: "--b2c-profile-edit-policy--"
    },
    authorities: {
        signUpSignIn: {
            authority: "https://--b2c-domain-name--.b2clogin.com/--b2c-domain-name--.onmicrosoft.com/--b2c-signup-signin-policy--",
        },
        forgotPassword: {
            authority: "https://--b2c-domain-name--.b2clogin.com/--b2c-domain-name--.onmicrosoft.com/--b2c-password-reset-policy--",
        },
        editProfile: {
            authority: "https://--b2c-domain-name--.b2clogin.com/--b2c-domain-name--.onmicrosoft.com/--b2c-profile-edit-policy--"
        }
    },
    authorityDomain: "--b2c-domain-name--.b2clogin.com"
}

/**
 * Configuration object to be passed to MSAL instance on creation.
 * For a full list of MSAL.js configuration parameters, visit:
 * https://github.com/AzureAD/microsoft-authentication-library-for-js/blob/dev/lib/msal-browser/docs/configuration.md
 * For more details on using MSAL.js with Azure AD B2C, visit:
 * https://github.com/AzureAD/microsoft-authentication-library-for-js/blob/dev/lib/msal-browser/docs/working-with-b2c.md
 */

 const msalConfig = {
    auth: {
      clientId: "--b2c-client-id--", // This is the ONLY mandatory field; everything else is optional.
      authority: b2cPolicies.authorities.signUpSignIn.authority, // Choose sign-up/sign-in user-flow as your default.
      knownAuthorities: [b2cPolicies.authorityDomain], // You must identify your tenant's domain as a known authority.
      redirectUri: "http://localhost:6420", // You must register this URI on Azure Portal/App Registration. Defaults to "window.location.href".
    },
    cache: {
      cacheLocation: "localStorage", // Configures cache location. "sessionStorage" is more secure, but "localStorage" gives you SSO.
      storeAuthStateInCookie: false, // If you wish to store cache items in cookies as well as browser cache, set this to "true".
    },
  };

/**
 * Scopes you add here will be prompted for user consent during sign-in.
 * By default, MSAL.js will add OIDC scopes (openid, profile, email) to any login request.
 * For more information about OIDC scopes, visit:
 * https://docs.microsoft.com/azure/active-directory/develop/v2-permissions-and-consent#openid-connect-scopes
 */
const loginRequest = {
  scopes: ["openid", ...apiConfig.b2cScopes],
};

/**
 * Scopes you add here will be used to request a token from Azure AD B2C to be used for accessing a protected resource.
 * To learn more about how to work with scopes and resources, see:
 * https://github.com/AzureAD/microsoft-authentication-library-for-js/blob/dev/lib/msal-browser/docs/resources-and-scopes.md
 */
const tokenRequest = {
  scopes: [...apiConfig.b2cScopes],  // e.g. ["https://fabrikamb2c.onmicrosoft.com/helloapi/demo.read"]
  forceRefresh: false // Set this to "true" to skip a cached token and go to the server to get a new token
};
The applications are read to run. Start the API application from visual studio. For the single page application, run
npm install and npm start. Browse to http://localhost:6420 to view the application. From here, you can click Sign-in in the upper right of the menu bar and register, sign-in or reset your password. Once signed in, you can edit the name of your user. Finally, you can play Brick Buster, a breakout inspired game. If you're signed in, you can save your current score or fetch all the scores you have saved. If anything doesn't work, the most likely reason is mis-configuration. Verify the API application has the values that correspond to the API app registration in Azure and the single page application has the values that correspond to the SPA app registration in Azure. Remember the sign-in, reset password, and edit profile policies are the same for both. Furthermore, make sure the strings that are the endpoints that were exposed in the API and added in the SPA match the strings configured the apps and the endpoints are /stats/read and /stats/write. Finally, ensure the values in the apiConfig.b2cScopes array in the spa config.js match the entire url of the API endpoint.


